This section includes instructions to manage OIDC identity providers.
 Watch to see how to manage OIDC compliant identity providers (4:33).
See:
Add an OIDC Identity Provider
-
On the Manage Identity Providers page, click the Add OIDC Provider button.
-
Complete the following fields. You can hover over the information icons
 for instructions as you complete each field.
-
Name (required): Enter a name for the identity provider (for example, MY IDP US). This name will be displayed in the External Authentication Provider options in System > Security > Users > <user>. Each identity provider name must be unique.
-
Scheme (required): A scheme is automatically generated in OneStream, but you can edit it. The scheme is used in the redirect uniform resource identifier (URI) (for example, scheme: MYIDPUS; redirect URI: www.applicationname.com/federation/MYIDPUS/signin.com). Each identity provider scheme must be unique and use alphanumeric characters. The scheme cannot have spaces.
IMPORTANT: If you include special characters in the scheme, it may cause an issue in the redirect URI. Enter a scheme that is alphanumeric with no spaces.
-
Issuer URL (required): Enter the issuer URL, which is typically the address of the external IdP (for example, https://mycompanyname.identityprovider.com). The issuer URL is in the discovery document of the identity provider. Confirm the issuer URL with your identity provider.
-
Client ID (required): A client represents an application. Enter the client ID, which is a unique identifier for the application on the external IdP (for example, 0oa73tc7yvXk93yT00rh2**********). If possible, copy and paste the client ID directly from the identity provider to ensure the value is an exact match.
-
Use PKCE (optional): Select this option to use proof key for code exchange (PKCE) with authorization code flow. A one-time key is generated by the client to send with a request instead of the identity of a client to ensure that only the client that requested the key can redeem it. If you select this option, the Client Secret field is optional.
-
Client Secret (required if Use PKCE is not selected): Enter the client secret from the identity provider. If possible, copy and paste the client secret directly from the identity provider to ensure the value is an exact match. A client secret is used by the client for an authorization code. A client secret is associated with a client and is sent with requests to prove the identity of a client. Characters entered in the field are masked for security.
-
Scopes (required): Scopes identify information to be used for authentication. A scope is a request from the identity server for a group of properties about the user. Select one or more options from the list to use them as scope values.
-
openid (required)
-
profile (optional)
-
email (optional)
-
address (optional)
-
phone (optional)
-
-
Include Custom Scopes (optional): Select this option to use a custom scope for authentication. If you select this option, enter the custom scopes in the field in a comma-separated value (CSV) format (for example, custom_profile,employee:details). Scopes in the list cannot be entered in the Custom Scopes field. Custom scopes can use letters, numbers, and special characters. Custom scopes cannot have spaces.
-
Include Custom Claims (optional): Claims are properties about the user sent from the identity provider. Select this option to use a custom claim identifier for authentication. If you select this option, enter the custom claims in the field in a comma-separated value (CSV) format (for example, uniqueID,email). Custom claims can use letters, numbers, and special characters. Custom claims cannot have spaces. Claims are searched in the order they are entered in the field.
NOTE: The default response type for the identity provider is code. If needed, contact Customer Support to change the response type.
-
-
Click the SAVE button.
-
Click the COPY button to copy the redirect URI displayed in the message to configure on the external IdP.
The redirect URI is passed from OIS to the external IdP where it is saved. The external IdP verifies that the redirect URI from OIS matches its list of URIs. Then, the external IdP knows where to send the response.
-
Test the identity provider to ensure the authentication method is valid. See Test an OIDC Identity Provider.
IMPORTANT: Test the identity provider configuration each time you add or edit an identity provider to ensure the authentication method is valid.
Test an OIDC Identity Provider
You can test an OIDC identity provider to ensure the authentication method is valid.
-
On the Manage Identity Providers page, find the identity provider to test.
NOTE: You can only test identity providers that are enabled.
-
Click the TEST button in the row for the identity provider. If the test is successful, it will walk you through the login process. You will need to enter your credentials for the external IdP.
-
Return to the OneStream Identity Management tab in your browser to view the test results. The results indicate if the identity provider has been configured correctly, if the user profile exists in OneStream, and if the user profile is configured to this identity provider. If the test is not successful, resolve the issue. See Resolve Common Issues when Testing OIDC Identity Providers. Contact Customer Support if needed.
-
Close the tab.
Resolve Common Issues when Testing OIDC Identity Providers
This section describes how errors display and how to resolve common issues that can occur when testing OIDC identity providers.
Incorrect Issuer URL
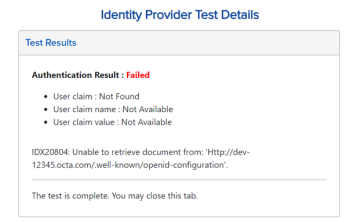
This error typically indicates that the issuer URL is set incorrectly for the identity provider. To resolve this issue, update the issuer URL in the Identity & Access Management Portal to match the issuer URL in the discovery document for the identity provider. See Edit an OIDC Identity Provider.
This error could also indicate a connection problem between OneStream IdentityServer and the identity provider. In some cases, the Internet Protocol (IP) address of the identity server may be blocked from accessing the identity provider.
Incorrect Client Secret
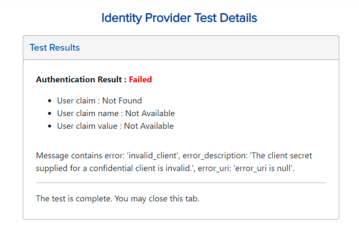
This error typically indicates that the client secret value entered in the Identity & Access Management Portal does not match what is configured on the identity provider. To resolve this issue, ensure the client secret entered in Identity & Access Management Portal matches the client secret from the identity provider. If possible, copy and paste the client secret directly from the identity provider to ensure the value is an exact match. See Edit an OIDC Identity Provider.
Redirect URI Not Valid
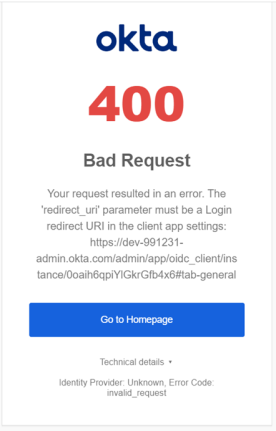
This is an example of an error that can occur when the redirect URI is not valid. Since this error comes from the identity provider, it can look different depending on which identity provider you use.
To resolve any errors related to the redirect URI, copy the redirect URI directly from the Identity & Access Management Portal when you add, view, or edit an OIDC identity provider and configure it on the external IdP. Remove any leading or trailing spaces when saving the redirect URI to the identity provider properties. See Add an OIDC Identity Provider, View Details of an OIDC Identity Provider, and Edit an OIDC Identity Provider.
User Does not Exist in OneStream
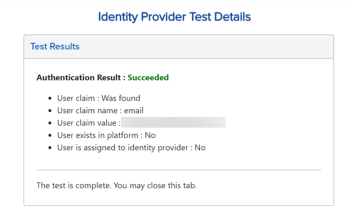
This test result indicates that the authentication with the external identity provider was successful. However, there is no user in OneStream that matches the claim. Typically, this indicates that the user does not exist in OneStream. To resolve this issue, log into OneStream and create the user. See How Users are Configured for Authentication.
Another possibility is that the claim received from the identity provider does not match the External Provider User Name of the user in OneStream. If that is the case, either create a custom claim for the identity provider so that the correct user name is being used to look up the OneStream user (see Edit an OIDC Identity Provider) or change the External Provider User Name in the user profile in System > Security > Users > <user> (see How Users are Configured for Authentication).

User not Assigned to Identity Provider
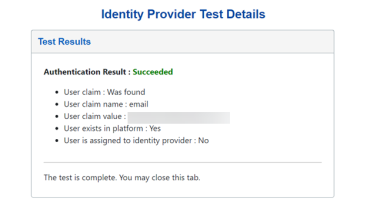
This test result indicates that the authentication with the external identity provider was successful and that there is a user in OneStream that matches the claim value that was received from the identity provider. However, this user has not been assigned to the correct authentication provider in OneStream. To resolve this issue, assign the user to the correct External Authentication Provider in the user profile in System > Security > Users > <user>. See How Users are Configured for Authentication.

View Details of an OIDC Identity Provider
-
On the Manage Identity Providers page, find the identity provider.
-
Click the VIEW button in the row for the identity provider.
-
You can click the COPY button to copy the redirect URI to configure on the external IdP. The redirect URI is passed from OIS to the external IdP where it is saved. The external IdP verifies that the redirect URI from OIS matches its list of URIs. Then, the external IdP knows where to send the response.
-
You can click the EDIT button to edit the identity provider. See Edit an OIDC Identity Provider.
IMPORTANT: Editing identity provider information may affect the ability to log in for configured users.
-
Click the CANCEL button to return to the Manage Identity Providers page.
Edit an OIDC Identity Provider
-
On the Manage Identity Providers page, find the identity provider to edit.
NOTE: You cannot edit an identity provider if you are logged in with it.
-
Click the EDIT button in the row for the identity provider.
IMPORTANT: Editing identity provider information may affect the ability to log in for configured users.
-
Edit the information. See Add an OIDC Identity Provider.
NOTE: Select Enable Identity Provider to enable the identity provider. Clear the check box to disable the identity provider. If you disable an identity provider, it may affect the ability to log in for configured users. An identity provider cannot be disabled if a configured user is logged in with the identity provider.
NOTE: You can edit all fields except the redirect URI. The redirect URI can be copied but cannot be edited.
-
Click the SAVE button.
-
Click the OK button to confirm.
-
If the scheme was updated, click the COPY button to copy the updated redirect URI displayed in the message to configure on the external IdP. The redirect URI is passed from OIS to the external IdP where it is saved. The external IdP verifies that the redirect URI from OIS matches its list of URIs. Then, the external IdP knows where to send the response.
IMPORTANT: Because the scheme is used in the redirect URI, if you update the scheme, you must copy the updated redirect URI to configure on the external IdP.
-
Test the identity provider to ensure the authentication method is valid. See Test an OIDC Identity Provider.
IMPORTANT: Test the identity provider configuration each time you add or edit an identity provider to ensure the authentication method is valid.
Remove an OIDC Identity Provider
-
On the Manage Identity Providers page, find the identity provider to remove.
-
Click the REMOVE button in the row for the identity provider.
IMPORTANT: An identity provider cannot be removed if users are configured to it. Remove the identity provider as an authentication method from any configured users before removing it.
-
Click the OK button to confirm. Once the identity provider is removed, it will no longer appear on the Manage Identity Providers page.